It looks as though fall is well underway (at least here in Calgary, where some day’s it’s apparently even winter), and when the cool weather hits I can’t help but want to make delicious, homemade soups! There’s just something about a nice, hot bowl of healthy soup on a cold day that brings my spirits up. Can anyone relate?
Last weekend was Thanksgiving here in Canada, and it was also the first time in 30 years that I have not been home for the holidays. It was admittedly a little tough to be away from my friends and family back home. However, some new friends here in Calgary were kind enough to invite me to my first Friendsgiving, which was wonderful! The food was absolutely delicious, and the company a true delight as well!
All of my favorite things: Muskoka Howling Wolf coffee, a Butternut Squash from Mom’s Garden, and pumpkin spice cookies 😉
My family was sweet enough to send me a care package though with some of my favorite things, and of course my winter coat and mittens for the colder days. My mom decided to grow butternut squash – a favorite of mine – in her garden this year, and I was surprised to receive one of her beautiful squash’s, all the way from Ontario, included in my care package.
Although I occasionally mix it up, there is one thing that I truly love to make with butternut squash: SOUP! My Creamy Butternut Squash Soup recipe is one of my all time favorites, and I feel a little bad for not sharing this delicious, healthy recipe with all of you sooner. Oops! Alas, the time has come for me to divulge the secrets of my infamous butternut squash soup! I hope you enjoy it 🙂
Creamy Butternut Squash Soup drizzled with real maple syrup and garnished with pecans!
Ingredients:
1 medium butternut squash, peeled cut into approx.1” cubes
1 medium yellow onion, diced
4 large carrots, peeled & diced
1 large sweet potato, peeled & diced
2 apples, peeled and diced
3 garlic cloves, minced
1 Tbsp. fresh ginger, minced
4 cups low sodium vegetable broth
2 Tbsp. ground cinnamon
1 tsp. ground nutmeg
1 tsp. fresh ground pepper
½ tsp. Himalayan pink salt or sea salt
¼ cup olive or coconut oil
2 cups unsweetened coconut (or cashew) milk
3 Tbsp. raw honey or real maple syrup (optional)
Method:
Heat olive or coconut oil in a large soup pan over medium high heat. Add in onions and sauté about 5 minutes or until starting to soften. Reduce heat to medium, add in minced garlic and ginger; continue to sauté about 3 minutes more, stirring often.
Add carrots, sweet potato, cinnamon, and nutmeg into pot, stirring to combine and sauté about 2 more minutes. Add in butternut squash, apple, and vegetable broth so that vegetables are covered to the top with liquid (add a little water if need be) and season with salt and pepper. Increase heat to medium high.
Once boiling, reduce heat to medium low and simmer for about 30 to 40 minutes, or until all veggies are soft. Turn off stove. Using an immersion blender, puree soup in pot until thick and smooth in consistency.
Gently stir in coconut milk, and honey or maple syrup, if desired, for a little more sweetness. Season with extra salt, pepper, and cinnamon to taste and if needed.
Notes:
Special equipment: Immersion blender. Alternatively, soup can also be transferred to a regular blender to puree and then poured back into pot. However, allow soup to cool a bit first if doing this for safety as it will be very hot.
Here in Ontario, Canada, summer has arrived! The kids are out of school and the weather is hot! When the warm weather rolls in I seem to find that my craving for delicious, cool treats revs right up too, and I don’t think I’m the only one with this dilemma. Who doesn’t want a tasty, cold treat in the midst of a hot summers day?!
As I’ve mentioned in other posts, the problem with a lot of these tasty cold summer treats is that they’re packed in processed sugars. Sure, they taste great, but the effect of all that processed sugar on your brain and body isn’t quite so lovely. Fortunately, there are still tons of great ways to make fresh, nutritious summer treats while avoiding the processed sugars and other unhealthy compounds (eg. preservatives) found in many frozen treats.
The recipe I’m sharing with you today is a great one for kids and adults alike. It’s gluten and dairy free, plus oh so rich, creamy, delicious, and nutritious! These pops are easy to make and the kids can certainly help out with making them too, or even give it a try on their own with adult supervision.
Getting kids involved in the kitchen and teaching them how to prepare food is an important step in establishing healthy eating patterns throughout life. The more experience and confidence kids can build about how to choose and prepare their food, the more prepared and able they’ll be to make healthy eating choices as they grow. After all, as research suggests, we’re more likely to give something a try if we feel we have the skills and knowledge to succeed.
To make these treats you’ll need a blender and popsicle molds. Preparing them takes about 10 minutes, plus at least 5 hours to freeze, so it’s best to let them sit overnight. This recipe makes approximately 6 medium sized pops.
Ingredients:
1 large ripe banana
3 Tbsp natural peanut butter, smooth or crunchy (or other nut butter if you prefer)
2 Tbsp raw, unpasteurized honey
1/2 tsp real vanilla extract
1/2 cup milk (I prefer cashew or coconut)
2 Tbsp chia seeds
Method:
Place banana, peanut butter, honey, vanilla and milk into a blender. Mix until thoroughly combined and pureed.
Gently fold in the chia seeds.
Pour the mixture into popsicle molds. Place in the freezer and allow to sit for at least 5 hours, or overnight is best.
When ready to serve, remove pops from the mold; close your eyes, take a deep breath, think of one thing for which you’re grateful, then ENJOY!
I hope you enjoy this tasty and nutritious summer treat. It’s the perfect guilt-free way to indulge in something yummy this summer! 🙂
Here in Ontario the weather has been heating up and this weekend is about to be no exception! I don’t know about you, but when the warm weather rolls in my craving for yummy, cold treats seems to roll in with it. Unfortunately, most ice creams and frozen treats are full of processed sugar, among other not-so-nutritious additives, which of course gives them their classic yummy taste. However, these tasty treats are also accompanied by the many downfalls of processed sugar consumption, such as “sugar crashes” and increased inflammation.
Fortunately, I have some great news: It’s absolutely possible to have a delicious, sweet, and nutritious frozen treat without all of that processed sugar! As some of you may know I do love my sweets, but I am particularly sensitive to sugar and especially it’s effects on emotional and mental health. As such I put considerable effort into exploring alternative options for treats that will be both nutritious and tasty!
Strawberry Ginger Mint Lassi
One such creation is based on the “Lassi”, which is not dissimilar to a milkshake. Lassi’s are easy to make and adaptable based on the ingredients you have. The one I’ll be sharing with you here features strawberries, ginger, and fresh mint, but you could easily substitute in a different type of fruit, or leave out the ginger and/or mint if they’re not your cup of tea.
What really helps improve the nutritional value of this particular recipe is that rather than using ice cream, I used plain non-fat Greek yogurt, which gives the Lassi a creamy texture plus lots of protein, without all of the fat and sugar found in ice cream.It’s important to use plain Greek yogurt, as flavoured ones are again full of added sugar.
To sweeten my Lassi, I’ve used local raw unpasteurized honey. Why is using unpasteurized honey important? When honey is pasteurized the process removes the nutritional benefits of the honey, such as antioxidants and vitamins. Thus it’s best to use unpasteurized honey in order to gain the most nutritional benefit from it.
Strawberry Ginger Mint Lassi
Ready to make this tasty and nutritious dessert? It only takes about 5 minutes to prepare. For 1 serving you will need…
Ingredients:
1 cup frozen strawberries
2/3 cup plain non-fat Greek yogurt
1 cup milk of choice (I prefer cashew or coconut)
5 or 6 fresh mint leaves
1″ ginger, peeled and diced
1/2 Tbsp raw, unpasteurized honey (or real maple syrup)
Method:
Place all ingredients into the blender and combine until thoroughly mixed. Garnish with mint if desired.
Close your eyes, inhale, think of one thing for which you’re grateful, and ENJOY! 🙂
Calvy enjoying some lounge time + my nutritious, yummy, Strawberry Ginger Mint Lassi!
I hope you’ll enjoy this sweet treat as much as I have!
Until next time, wishing you much health and happiness 🙂
I’m back! 🙂 In the midst of travelling, a move, planning a trip to Europe for the summer, and finishing my masters degree, things have been a bit hectic to say the least. Things are coming along well though and just about finished up.
A month ago I visited beautiful British Columbia again – this time I was mainly in the Vancouver area and it was lovely. We took the Ferry over to Vancouver Island and checked out Victoria for a few days before returning to Vancouver. The Ferry ride was fun and the view from the observation deck on the ship was stunning.
Taking the Ferry to Vancouver Island
In Victoria was visited the Victoria Butterfly Gardens, Butchart Gardens, and the Fisherman’s Wharf. While it was all spectacular, visiting the wharf was my favourite part as we enjoyed fresh fish and chips, and most excitingly of all came face to face with wild sea lions, which I adore!
Victoria Butterfly GardensBeautiful Butchart GardensAdorable sea lion at the Fisherman’s Wharf in Victoria
My final day in Vancouver was spent hiking at Deep Cove in the rain – what a wonderful experience!
Hiking in the rain at Deep Cove in Vancouver
Back in Ontario now, the weather here has been quite variable. Warm during some weeks and rather rainy and cool during others. Lately temperatures have been more on the cool side, however it looks as though beginning next week the warmer weather will be coming and hopefully sticking around – come on summer!
With my busy schedule it’s be ever more challenging to eat well consistently and to choose healthy, nutritious options that taste great as well. Fortunately, from the literature as well as my own experiences I understand the importance of maintaining a healthy diet for optimal physical and mental health.
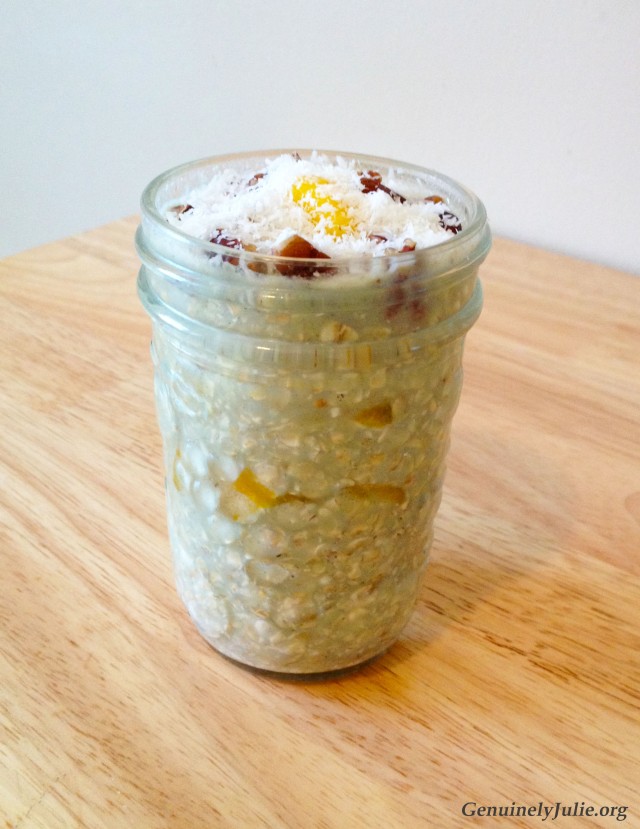
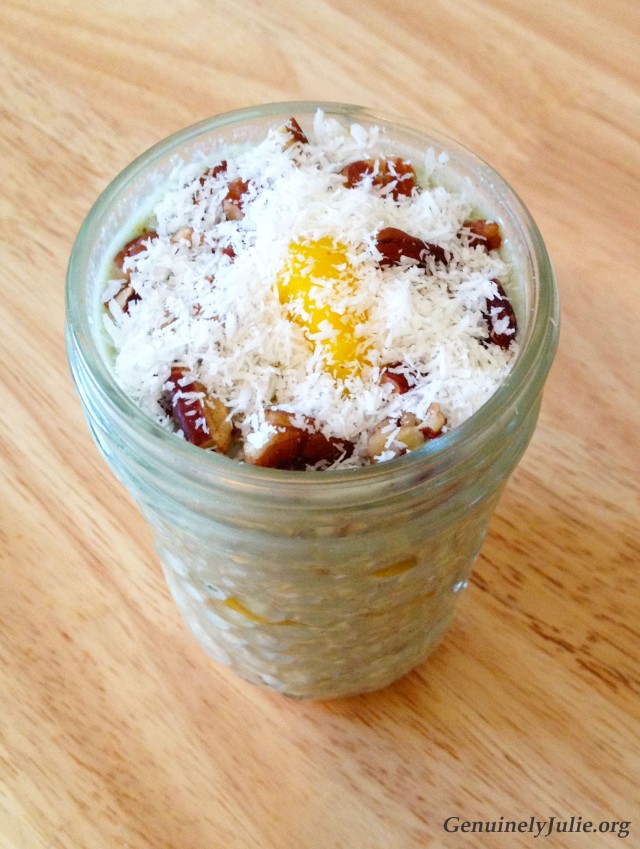
One of my favourite recipes to prepare for breakfast or lunch is overnight oats. There are tons of variations one can explore and these can be prepared quickly and easily. Oats can be purchased gluten-free, and I prefer to use almond, cashew or coconut milk to avoid dairy. Oats are high in fiber, low in sugar, and filling. When combined with protein powder (as I have done here using Vega Vanilla Chai Protein Powder), overnight oats will help you maintain energy levels and fullness throughout the day and to avoid the sugar crash that accompanies many processed cereals.
Mango Chai Overnight Oats
For 1 serving of Mango Chai Overnight Oats you will need a 250 mL mason jar (or other glass container); it takes 5 minutes to prepare.
Place oats and protein powder into jar and mix with a spoon. Add in half of the milk, mixing to combine. Add in mango and stir in gently, then add in remaining milk and stir gently.
Top with nuts and shredded coconut. Place lid on jar, then put mixture into the fridge to sit for at least 4 to 5 hours, or over night. Enjoy! 🙂
Delicious Mango Chai Overnight Oats
I hope you’ll enjoy this tasty and nutritious treat 🙂
Until next time, wishing you health and happiness!
Here in Ontario it appears that winter was not quite ready to move on, as we got one more cold spell and even some snow over the weekend. The forecast is calling for a few more days of cold, and then the temperatures are expected to start to rise again, thankfully! Spring and summer – you’re welcome to make an appearance any time now!
Although I tend to hide inside on these these chilly, snowy days and don’t get to enjoy much of the outdoors, one perk is that I do find myself spending a little extra time in the kitchen trying to come up with fun new recipes. I love running my culinary “experiments” on days like these, and it’s even more exciting when the result of the experiment is actually a tasty one haha!
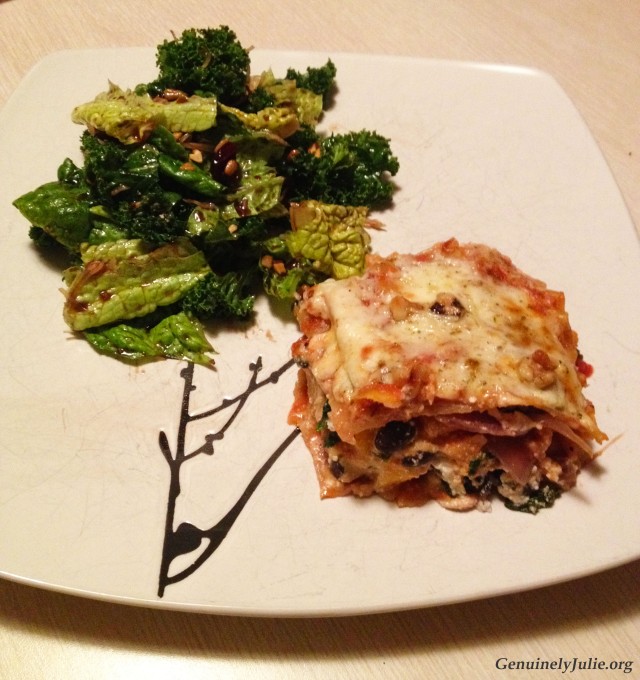
Take for example the recipe I’m sharing with you today: my Butternut Squash, Kale, and Caramelized Onion Lasagna – a delicious and healthy vegetarian dinner option. I wasn’t sure how this would go and whether the ingredients would come together to compliment one another, but fortunately they did. This lasagna is packed with fresh and nutritious veggies, and black beans for some extra fiber which aids digestion and helps you to feel full for longer. I used Blue Menu brand whole wheat lasagna noodles (more fiber – yay!), along with low sodium pasta sauce, and finished it off with a bit of herbs, spices, walnuts, and cheese.
This recipe is relatively easy to prepare, delicious and filling (with all that fiber!), and will keep well for about 4 to 5 days if stored in an air tight container in the fridge. It does take a little more time to prepare – about 1.5 hours – but I assure you, it’s totally worth it! As always do try to use fresh, local, and organic ingredients when possible to get the greatest nutritional benefits from your food.
1 medium butternut squash (about 4 to 5 cups), peeled and cut into 1″ cubes
1 large red onion, sliced vertically
4 cups fresh kale, washed and chopped (use spinach if preferred)
4 cloves garlic, diced
1 (19 oz) can black beans, drained and rinsed (I like the PC Blue Menu kind)
1 (650 mL) jar low sodium pasta sauce
1 cup ricotta cheese
1.5 cups Asiago or mozzarella cheese, shredded
3 Tbsp chopped walnuts (optional)
1 tsp dried sage
1 tsp dried oregano
1 tsp parsley
Salt and pepper to taste
2 – 3 Tbsp olive oil
Method:
Drizzle a rectangular (13 x 9 x 2 inch) baking dish with about 1/2 tbsp olive oil and set aside. Preheat oven to 375*F.
Soak lasagna noodles in cold water for about 20 minutes. Meanwhile, in a medium bowl gently stir to combine black beans and ricotta cheese, set aside.
In a large pan, heat olive oil over medium-high heat and add in onions. Saute for approximately 10 minutes, or until beginning to soften. Add in butternut squash and season with salt and pepper. Reduce heat to medium, cover and continue cooking for about 10 to 15 minutes stirring occasionally, or until the squash begins to soften and is slightly brown.
Add in kale and garlic, sage, oregano, and parsley, stirring gently to combine. Reduce heat to medium low, cover and cook about 5 minutes more or until kale is slightly wilted. Remove from heat.
Layer 1: Pour 3/4 cup (about 1/3 of jar) of pasta sauce into baking dish, smoothing out to cover bottom of dish. Arrange 4 lasagna noodles over the sauce, then top with 1/2 of the veggie mixture, then 1/2 of the ricotta cheese black bean mixture.
Layer 2: Cover with 4 more noodles, 3/4 cup pasta sauce, then remaining 1/2 veggie mixture, and 1/2 cheese black bean mixture.
Layer 3: Cover with 4 more noodles, then remainder of pasta sauce. Sprinkle Asiago or mozzarella cheese over top, then walnuts, some fresh ground black pepper and a sprinkle of parsley.
Bake covered for about 25 minutes. Remove from oven and uncover. Bake for about 5 to 10 minutes more, or until top is slightly brown. Remove from oven and allow to cool for about 10 minutes before serving.
Smile, think of one thing for which you’re grateful, and ENJOY! 🙂
Slice of delicious & healthy Butternut Squash, Kale, & Caramelized Onion veggie lasagna with a side of greens + simple olive oil & balsamic vinegar dressing from The Pristine Olive
I hope you’ll enjoy this hearty and healthy veggie lasagna as much as my family and I did; It’s the perfect meal for a chilly day, and is sure to warm and fill up your bellies and hearts, too!
I hope you’ve all been having a lovely week so far. Commitments with work have been keeping me quite busy, thus why I haven’t been posting as often, unfortunately. During hectic times like these maintaining a healthy routine can be especially challenging. However, it’s also times such as these when eating well and making healthy choices becomes most critical in staying balanced both mentally and physically.
I’m sure I’ve mentioned this before, but when I start to feel a little stressed I tend to crave a sweet treat, but I know all that extra sugar and processed stuff isn’t good for me and will only serve to exacerbate my stress levels. Luckily, this is perfect motivation for me to have a little fun and try to develop healthier dessert alternatives that I’ll still be able to enjoy.
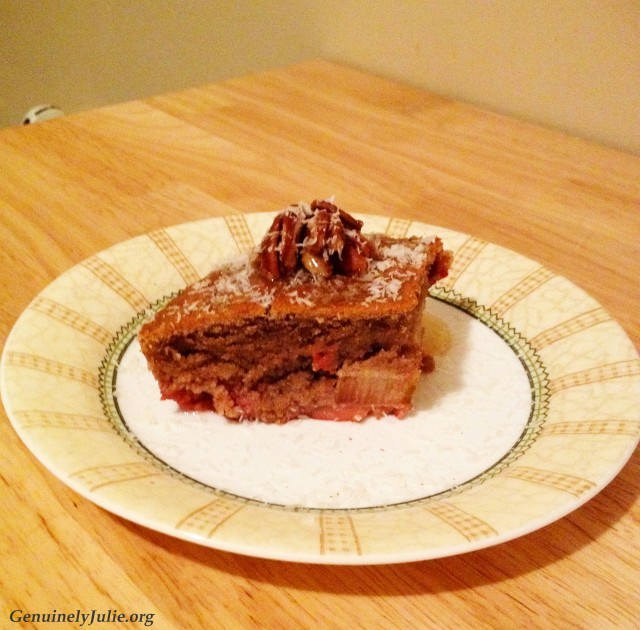
One of my favourite desserts is my moms “upside-down cake”. It can be made with almost any fruit you like, however my personal favourite is strawberry-rhubarb. I remember as a kid I’d get so excited and look so forward to occasions when my mom would make this cake. The original recipe is of course your traditional dessert situation – that is, loaded with butter, sugar, and refined white flour. Don’t get me wrong, it’s delicious as all-get-out, but obviously not especially healthy.
So, while doing some work last night I found myself really craving this delicious upside-down cake, and I thought to myself: “self, can you make this delicious treat into a healthier more nutritious version?” Turns out I can! See…
Strawberry-Rhubarb Upside-Down cake topped with pecans, raw honey, and shredded coconut!
By following my moms original recipe and subbing in coconut oil for the butter, maple syrup for sugar, coconut and brown rice flour for regular flour, and coconut milk for regular milk, I was able to come up with a recipe for my favourite cake that is a significantly healthier version than the original, as well as being gluten and dairy free!
I seriously debated sharing this one with you, I guess because the little girl in me wanted to selfishly hoard my moms delicious upside-down cake recipe all to myself haha. Fortunately, the adult Julie reasoned that it would be quite inconsiderate to withhold such a delectable and reasonably healthy dessert recipe from you.
And so, I will now share with you my healthy version of my moms upside-down cake! I’ve provided measurements for both a small serving (6 x 2 inch round) for about 2 people, and a full sized (13 x 9 x 2 inch) cake. This recipe works great too with apples, peaches, blueberries, or raspberries. I meant to take a photo of it looking all pretty in it’s dish after it came out of the oven, but it looked so yummy that I started eating it and forgot, so these photos of it already on the plate will have to do heh.
For the small (6 x 2 inch) cake…
Ingredients:
For the Bottom…
1 Tbsp. coconut oil, melted
1 tsp real maple syrup, room temperature
3/4 cup strawberries & rhubarb (fresh or frozen)
1/2 tsp lemon juice
For the Top…
2 Tbsp coconut oil, softened
3 Tbsp real maple syrup, room temperature
1 egg, beaten
1/2 tsp real vanilla extract
2 Tbsp coconut flour
3 Tbsp brown rice flour (gluten free)
1 tsp cinnamon
1/2 tsp baking powder
2 Tbsp coconut milk
Method:
Oven at 350*F
Bottom: whisk coconut oil and maple syrup together, then spread over bottom of baking dish. Arrange fruit on top and sprinkle over with lemon juice. Set aside.
Top: in a bowl, whisk together coconut oil and maple syrup until a smooth paste forms. Add in egg and vanilla, mix well until combined.
In a separate bowl, combine flours, cinnamon, and baking powder. Add to the wet mixture, whisking to combine.
Add coconut milk 1 Tbsp at a time, mixing it in gently. If the batter is a little too thick and sticky, add a bit more milk. It should be a thick, smooth texture when finished.
Pour the cake mixture over top of the fruit. Bake for approximately 40 to 50 minutes, or until the top is golden brown.
Allow to cool in baking dish for about 15 minutes before serving.
To serve, top with more fruit, nuts, or whatever else you like, or enjoy as is! 🙂
A lightened up version of my mama’s Upside-Down Cake – made here with strawberries and rhubarb and topped with raw honey, pecans, and shredded coconut!
For a full (13 x 9 x 2 inch) cake…
Ingredients:
For the bottom…
1/4 cup coconut oil, melted
1/4 cup real maple syrup, room temperature
2 cups strawberries & rhubarb (or fruit of choice, fresh or frozen)
1 Tbsp lemon juice
For the top…
1/2 cup coconut oil, softened
1/2 cup real maple syrup, room temperature
1 egg, beaten
1 tsp pure vanilla extract
1/3 cup coconut flour
1 cup brown rice flour
2 tsp baking powder
2 tsp cinnamon
3/4 cup coconut milk
Method: same as described above. Cooking time may be slightly longer.
I hope you’ll love this lightened up version of my mom’s delicious Upside-Down cake as much as I do! 🙂
I hope your week has been off to an awesome start! I’ve been trying to finish the manuscript I’m writing which is due by months end for presentation of my research findings in a scientific journal. While I’m looking forward to hopefully having my paper accepted and published, it certainly is a LOT of writing and I’ve had to put extra effort into staying focused.
Keeping on track with my fitness program and healthy eating has also been a little more challenging given the circumstances, but I’m almost there and looking forward to having this manuscript finished and submitted. As for the follow up post on my last piece in which I discussed my personal journey with depression, it’s a coming soon 🙂
The science behind depression is pretty complex and it’s a topic I feel deserves considerable attention. I’ll be doing my best to communicate the scientific information in such a way that makes it approachable and clear. I’m excited to have the opportunity to share such information about depression with you as I feel knowledge helps one to develop awareness and understanding, which fosters acceptance, and counters the stigma that tends to be associated with many forms of mental illness, including depression. So please stay tuned for that post.
Okay, lets talk about food! I don’t know about you, but when I’m under pressure and feeling a little stressed I tend to crave sweet treats. Unfortunately, as I’ve discussed before sugar does some pretty bad things to the body and mind (you can learn more on the specifics of this here), so finding a balance between satisfying my sweet cravings and keeping things healthy has been my focus.
While experimenting in the kitchen the other night, I happened to come up with a pretty darn tasty treat that also so happens to be reasonably healthy, and both gluten and diary free: Apple Pecan Maple Crumble!
Apple Pecan Maple Crumble
This yummy treat is quick and simple to make, and reasonably healthy for a dessert. Real maple syrup replaces the traditional granulated sugar that most dessert recipes call for, or if you prefer honey can be used instead. It should be noted that maple syrup, while a healthier alternative to granulated processed sugar, still contains a considerable amount of sugar which is why it’s best consumed only in moderation. More information regarding the nutritional components of maple syrup can be found from this article published by Authority Nutrition.
So, how does one make this gloriously delicious dessert, you may be wondering? Well… let me tell you! As always, please try to use fresh, local, organic ingredients when possible. This recipe makes about two smaller portions, or one large one.
Ingredients:
For the bottom…
1 large apple, peeled, cored, and chopped into small chunks
2 Tbsp dried dates, coarsely chopped (or raisins)
1/4 tsp nutmeg
1/4 tsp cinnamon
1 Tbsp real maple syrup
For the topping…
3 Tbsp gluten free oats (or regular if you prefer)
1 Tbsp ground flax seed
1 Tbsp coconut flour
1/2 tsp cinnamon
2 Tbsp coconut oil, melted
2 Tbsp real maple syrup
2 Tbsp pecans, chopped
1 Tbsp coconut, shredded and unsweetened (optional)
Method:
Grease two small (or one medium sized) oven safe ramekins with coconut or olive oil.
For the bottom layer, combine all ingredients in a bowl and toss gently to combine apples and dates with the spices and maple syrup. Pour mixture into greased baking dish.
In another bowl mix oats, ground flax seed, coconut flour, and cinnamon together. Add in melted coconut oil, then maple syrup. Stir with a fork until mixture is thoroughly combined and forms a crumbly consistency. Stir in pecans.
Top the bottom apple layer with the crumble mixture. Sprinkle with unsweetened, shredded coconut if you like.
Bake uncovered in the oven at 375 degrees Fahrenheit for 25 to 30 minutes, or until the top is golden brown (note: time may vary due to differences in individual oven temperatures, so keep an eye on it and adjust timing accordingly). Allow to cool for 10 to 15 minutes before serving.
Pause to think of one thing you’re grateful for, then smile and enjoy! 🙂
Yummy Apple Maple Pecan Crumble
Well folks, I hope you enjoy this tasty treat as much as I do. This healthier alternative to traditional fruit crumble recipes is quick and easy to prepare, and aside from the extra sugar from the real maple syrup, it’s nutritious too! This is also a great one for anyone having digestive motility issues, such as constipation, as the ground flax seed and coconut flour are very high in fiber, which helps to move things along the GI tract and promotes gut health.
Wishing you all a wonderfully happy and healthy week!
I hope you’ve all been having a wonderful week. Mine has been a productive yet hectic one between meetings with students, and writing a manuscript for submission to a scientific journal presenting my findings from a study I did on the effect of oxytocin on pro-inflammatory cytokines and sickness behaviour. With any luck (finger crossed) it will get accepted and published.
We’ve been getting a lot of snow here in Ontario and the temperatures have dropped again so it’s pretty chilly. I recently decided I’d like to learn how to snowboard, and having acquired a snowboard and boots from my wonderful aunt I think there will finally be enough snow on the ground for me to go out and give it a try. Should be interesting… dun dun dunnn lol.
Calvy hasn’t been enjoying the weather much. He loves to get outside and play. So with all of this snow he mostly lies around and sleeps, has a few rowdy spurts here and there throughout the day where he bolts around like a maniac, and snacks. He will be happy when spring is here and he can spend all day outside, hunting leaves and such heh. Oh to be a cat.
Calvy and his bff, Little Dragon, relaxing inside on a cold winter day
I’ve been keeping on track with my Kayla Itsines Bikini Body Guide fitness program which I recently started, and so far I’m really enjoying it. I like that it’s challenging yet quick (each workout is only around 30 minutes), as this approach compliments my busy schedule very well. Another plus is that it can be done at home and requires minimal special equipment, which I really like as I’m not a fan of going to the gym and prefer to do my workouts alone. I’m certainly feeling (and starting to see) the results of this program!
My healthy eating has been right on track too. Interestingly, I find this healthful practice much easier to be consistent with than I do exercising. My assumption is that since I’ve already established the habit of healthy eating and cooking for myself, it has become ‘second nature’ to now engage in healthy dietary practices. Not to mention coming up with fun, nutritious meals is a great break from all the writing I regularly do, especially lately!
As you may have noticed I mostly stick with vegetarian-type dishes because well, meat doesn’t really appeal to me. But occasionally I do like to enjoy some fish or seafood. One awesome recipe that I love to make which is quick and delicious, yet healthy is Cashew Crusted Cod with Mushroom Kale Quinoa!
Cashew Crusted Cod with Mushroom Kale Quinoa
Based on ingredients I had at the time I actually adapted my version of this recipe from the original “Almond Encrusted Tilapia” which I found on a wonderful blog called Fit Foodie Finds. I’ve tried the Almond Tilapia recipe and it’s super tasty as well, so if you’re a fan of tilapia please check this one out. However, I for whatever reason seem to prefer the cod-cashew combo (ha! try saying that five times fast). I find the cashews add a little extra sweetness to the cod, and I prefer the taste of cod a bit more than tilapia.
The fish only takes about 10 minutes at most to make, while the mushroom kale quinoa takes maybe about 20 minutes (and can be prepared ahead of time if need be and then warmed up). Equipment wise, you’ll only need some type of food processor for the cashews (I use a Magic Bullet). Alternatively, if you don’t have a food processor you can put your cashews into a plastic bag, wrap it in a dish towel, put it on the floor and stomp on them (yes, I’ve done this before haha). I know this sounds ridiculous, but desperate times call for desperate measures, and this honestly does work (albeit not as well) if you find yourself without a food processor. Not to mention if you’re feeling stressed and agitated stomping on some cashews may help to alleviate these feelings in a more productive way 🙂
Alright, enough chit chat. As always try to use fresh, local, organic ingredients when possible. Here’s how you make 2 servings of my Cashew Crusted Cod and Mushroom Kale Quinoa recipe:
Drizzle both sides of cod fillets with olive oil, then coat the side of the fish that’s facing you with ground cashews and a pinch of black pepper. Meanwhile heat coconut oil in a pan over medium-high heat.
Place fish in pan with the cashew crusted side down, then top the uncoated side (that’s now facing you) with remaining cashews and a bit of black pepper.
Cook fish for about 2 or 3 minutes then flip. Continue cooking for about 2 minutes more, or until fish flakes with a fork and cashew crust is golden brown on both sides.
Remove from heat and spritz with fresh lemon juice. Serve hot and enjoy!
Mushroom Kale Quinoa
Ingredients:
1 cup fresh mushrooms, sliced
2 cups fresh kale, washed & chopped
3 – 4 cloves garlic, diced
1/4 cup onion, diced
1.5 cups cooked quinoa
1 tsp turmeric
salt & pepper to taste
1 – 2 Tbsp olive oil
1 tsp fresh lemon juice (optional)
Method:
Cook quinoa according to package directions, then set aside.
Meanwhile heat olive oil over medium-high heat. Add in onion and saute for about 5 minutes, or until starting to soften. Reduce heat to medium and add in garlic; saute about 2 minutes more.
Add in mushrooms, kale, turmeric, a pinch of salt, and pepper. Stir to combine, cover and cook over medium heat stirring occasionally for about 10 minutes, or until the mushrooms and kale begin to soften.
Remove from heat, add in warm cooked quinoa, and stir to combine (Note: If you’d like a little citrus flavor, spritz a bit of fresh lemon juice on at this time)
Think of one thing for which you’re grateful, smile, & enjoy!
Yummy Cashew Crusted Cod + Mushroom Kale Quinoa
Here you have it folks: a quick and nutritious meal that’s easy to prepare and oh-so-yummy! This one’s perfect for a busy weeknight, since it won’t take a lot of time to prepare. To make things even easier, try having your veggies prepped in advance and ready to go. You could even cook your quinoa ahead of time, then simply reheat it when adding it to the veggies!
For those of you with little ones, the cashew crusted cod recipe can easily be adapted to make a healthy version of fish sticks for the kids by simply cutting the fish into strips, then prepare and cook them in the same way. This is a much healthier and more nutritious (and better tasting!) option compared to the processed stuff you find in the frozen isle of the grocery store.
On a final note: this meal is also dairy and gluten free! Turns out quinoa is actually not a grain, but rather a pseudocereal seed. However, issues with gluten can come into play when quinoa has been processed in a facility alongside grain products. More on this can be found here. Thus, when purchasing your quinoa just be sure to look for that which has been processed in a grain free facility or that is certified to be gluten free.
Well it’s about time for me to get back to writing up that manuscript. Until next time, happy eating, folks! 🙂
Maybe it’s the Canadian in me but I love maple syrup! And not the fake stuff – ew. I’m talking about the real 100% pure maple syrup. Yes, it’s a bit more expensive compared to the fake “maple flavored” syrup (that’s actually loaded in highly processed sugars and quite bad for you), but I assure you it’s worth it to invest in the good stuff!
Real maple syrup can not only be used as a natural sweetener, but it also tastes great root veggies like carrots and beets, on squash or brussels sprouts, and who doesn’t want an excuse to enjoy pancakes or waffles? heh I know I do!
100% Real Canadian Maple Syrup
I’m sure I mentioned this at least a dozen times but I also love matcha! It’s fun to experiment with it and see what kinds of cool tasty recipes I can come up with. Sure, not all might turn out great but I could also end up creating the next great thing! From talking with friends and family I get the sense that many people often view cooking and making meals as a chore. And I’m sure that’s exactly how it feels if you’re not willing to have fun with it. Rather than seeing it as a tedious task though, try viewing making your next meal or snack as an opportunity for culinary adventure!
This might sound silly, but hear me out. If you’re doing something you enjoy you’ll be more likely to do it and doing something you enjoy facilitates positive mood states. Studies have shown that a positive emotional state allows individuals to be more creative thinkers and to find what they’re doing more enjoyable.
So, next time you enter the kitchen ready to try a new cooking experiment consider this: sure, your experiment might not turn out great – this is always a possibility. However, it could also turn out to be the next amazing recipe that all of your family and friends are asking for and can’t get enough of. There’s only one way to find out!
Anyhow, coming back to matcha. It’s delicious and has an abundance of health benefits, which you can learn more about here. However, I wanted to make sure these weren’t just biased claims or anecdotal evidence, so I took a look through the published scientific journals. Here’s what I found:
Experiments have demonstrated evidence supporting the positive health benefits of matcha. For instance, in a recent study by Xu and colleagues (2016) published in the journal of Food and Function it was found that matcha significantly lowered blood glucose levels, HDL (high-density lipoprotein) cholesterol, and oxidative stress caused by a high-fat diet. The authors concluded that “Matcha has beneficial effects through the suppression of the blood glucose (BG) accumulation and promotion of the lipid metabolism and antioxidant activities. Moreover, the water-insoluble part of Matcha is suggested to play an important role in the suppression of diet-induced high levels of lipid and glucose” (Xu et al., 2016). Pretty cool eh?!
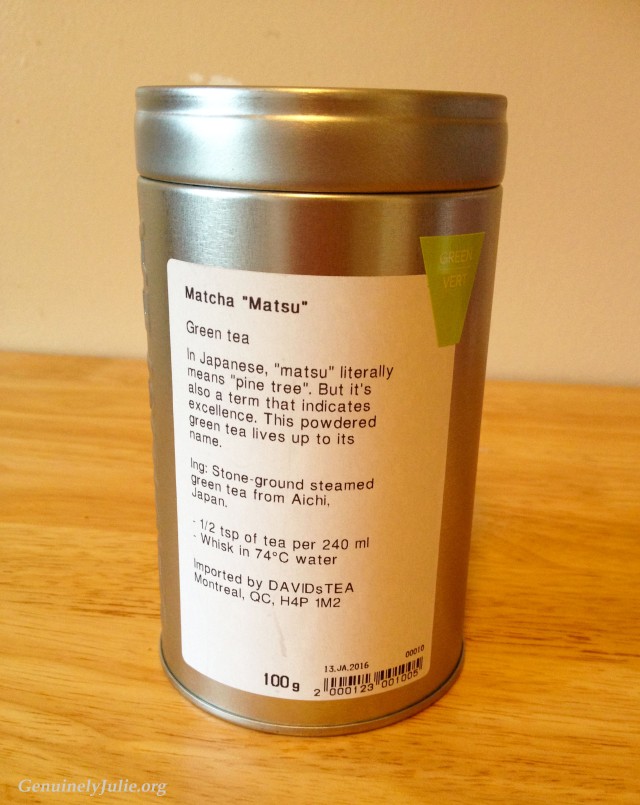
Matcha Green Tea from David’s Tea
So now that I’ve given you some of the science behind what matcha does and have hopefully convinced you of how awesome this stuff is, I’d like to share a fun recipe I came up with!
Matcha lattes are one of my most favourite beverages out there and while playing around in my kitchen I discovered I can actually make them at home from scratch, and I don’t even need one of those fancy frothing machines! All it takes are the ingredients, a small pot, and a single serve blender such as a Magic Bullet (a hand mixer or immersion blender might work too but I haven’t given it a try).
Maple Matcha Latte in my favourite Turtle Mug heh
Here’s how to make 1 serving of my (oh-so-Canadian) Maple Matcha Latte:
Ingredients:
1 cup unsweetened coconut milk
1 Tbsp. real maple syrup
1 tsp. matcha
1/4 tsp. real vanilla extract
1/4 tsp. cinnamon
Method:
Combine coconut milk, maple syrup, and vanilla in a small pot over medium heat. Whisk in cinnamon and matcha. Continue stirring and heat to desired temperature.
Transfer mixture into a single serve blender (such as a Magic Bullet or Ninja) and blend for about 30 seconds. This is what will give it that nice frothy texture on the top.
Pour into a mug, garnish with cinnamon, nutmeg, cocoa, or whatever else you like.
Smile and enjoy! 🙂
Maple Matcha Latte garnished with cinnamon
This healthy, dairy free treat is so yummy and complements any morning, or chilly evening for that matter, perfectly. I hope you’ll enjoy it as much as I do!
You may have noticed I haven’t posted anything new during this last week. This is because I was away on vacation for my beautiful friends wedding in the Dominican Republic.
Beautiful White Beaches in the Dominican Republic
I had a wonderful time, but I’m glad to be home (minus the cold temperatures haha) and reunited with my sweet kitty Calvin! Boy did I miss that little fur ball!
Anyhow, I learned a thing or two about keeping healthy while traveling on this trip, and unfortunately I did so the hard way. Normally I eat pretty healthy, limiting my intake of processed items, sugar, dairy, gluten, meat, etc. and apparently my body has become accustomed to this and quite enjoys this sort of diet.
How do I know this? Well, because I made the mistake of eating and drinking all the things I’ve cut out over the past year or so my tummy was NOT impressed! I spent most of the time with a stomach ache, which really I knew better and should have been smarter about my dietary choices. But hey, I learned some valuable lessons about keeping healthy while away traveling. Here are some of the things I learned:
Try, as much as possible, to maintain your usual diet to avoid running the risk of experiencing gastrointestinal issues. This can be tricky with so many tasty looking treats around (not to mention all those sugar loaded tropical drinks!), but in my experience it’s worth the extra trouble.
Try to maintain your typical activity routine at least to some degree. Normally I do yoga about 3 to 4 times a week, plus workouts with light weights about 4 times a week. I did none of this while I was away and I can certainly feel my body is more lethargic, lacking energy and strength, and my GI system is out of balance.
Attempt to get a reasonable amount of sleep (between 7 to 8 hours) each night. I know it’s tempting to skip this and the thought goes something like “I didn’t go on vacation to sleep”. Well yes, this might be true but you’re body doesn’t really care and requires adequate amounts of sleep to function properly. Mess with this and you run the risk of disrupting your internal balance and ending up not feeling very well.
Continue taking any supplements you regularly take. I was smart enough to bring with me my amazing Pro-15 probiotics from Hyperbiotics that I take daily (I’ll be writing a whole bunch about these in the next few months so stay tuned!). I think this is why I didn’t have more severe GI issues due to my poor dietary choices while on this trip.
Take a break from work! Most of the time I enjoy my work, which makes it not really feel like “work” at all and gives me incentive to keep at it. While not exactly a bad thing, it’s important to take time away from the usual routine to find some stillness and reflect. Enjoy nature! Fortunately, this is one thing I DID manage to do right while away and it was wonderful!
A crane hunting for some lunchTurtle watching from the poolside – I adore turtles!
Now back home in Canada my tummy is still a bit sore and I expect it’ll take a few days for it to recover. Fortunately, I was able to get right back into my regular eating habits and I can already feel the difference it’s made. My energy levels are improving, along with my mood, and my stomach is slowly but surely feeling less bloated and back to normal.
Sunset as seen from my window on the plane ride home
This morning I woke up feeling much better than I have the past few days, but noticing my guts still feel a little off I thought I’d make use of a fantastic natural remedy for stomach issues – GINGER! Considerable research has accumulated suggesting that ginger is effective for treatment of GI issues, nausea, and a great many other health issues. If you’re interested, this article from Authority Nutrition discusses some of these implications in greater detail.
As I was saying, I love ginger and use it whenever I can; in everything from soups to smoothies, stirfrys, and especially when I’m having tummy trouble, it really does the trick! So this morning I enjoyed a cup of one of my favorite teas from David’s Tea – their Organic Ginger Pear tea. Almost instantly I could feel my stomach being soothed.
I then decided to make a yummy smoothie bowl for breakfast featuring some serious “superfoods” including ginger, acai berry powder, and strawberries. I was pleasantly surprised with just how delectable this recipe turned out to be, especially considering it helped my tummy ache to feel better too, boosted my energy, and kept me feeling full for several hours after.
Yummy Strawberry Ginger Acai Smoothie Bowl
I like making smoothie bowls because I can put fun toppings on afterwards and feel like I’m getting a real treat haha. However, they do take more time to prepare and eat, so if you’re pressed for time and on the go, please remember you can simply leave this in a travel cup and take it with you. Don’t forget your straw! 🙂
Anyhow, here’s what I did for 1 serving of my Strawberry Ginger Acai Smoothie Bowl. As always, try to use fresh, organic whole foods when possible:
Combine ginger, banana, strawberries, and acai berry powder in blender. Add enough milk to just about cover the contents. Then add honey. Blend until smooth, then pour into a bowl and top with some of your favorite, healthy items
Close your eyes, take a deep breath, and think of one thing for which you are grateful
Smile and enjoy! 🙂
Strawberry Ginger Acai Smoothie Bowl
I hope you’ll find this as delicious and nourishing as I did. It’s a great tasting, nutritious recipe for kids too, particularly if the little ones are having tummy troubles.
If you give this tasty recipe a try I’d love to hear your thoughts on it. Don’t forget to share photos of your version of this yummy, wholesome creation with #genuinelyjulie